A combination of durability, safety, and style is just what a deck stair offers hence more and more people are looking for information on building deck stairs.
It is a structure situated outside raised from the floor to form a support. It is accessed from the ground through a staircase or from the house or building where it is being constructed.
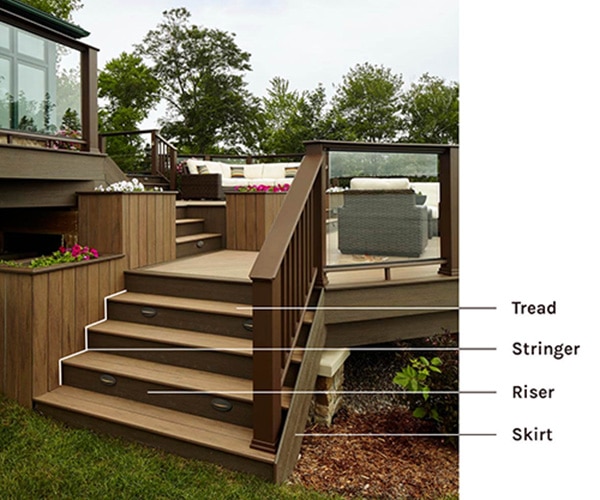
The Anatomy of Deck Stairs
The body of a deck stair has the following features;
- Risers
- Skirts
- Treads
- Stringers
Treads
The tread is the deck board of each stair and it is laid horizontally.
Risers
Riser or toe kick, as it may also be called, is the board on the deck covering the vertical spaces between the treads.
Stringers
A stringer is a wide board that runs from the deck to the landing at an angle. They are situated beneath the stairs and form a support for risers and treads.
Skirts
A skirt enhances the appeal of the deck by enclosing the undersides. The process of covering up the sides of a deck is known as skirting and it can be done with custom screening or decking material.
Simple Advice To Help You Build Decking Stairs
The position of the deck and the availability of space determine the design, size, and shape of the deck stairs that would determine the decor of the house.
Tips For Building Deck Stairs
To properly construct or build deck stairs, you would need to put into careful consideration, the decor, safety, and requirements.
The stairs are an important part of the deck as they serve or function as access leading to the deck.
Materials for this construction include; virgin vinyl, steel, recycled plastic, solid wood, and aluminum. The combination of plastic resin and wood fibers can also be used to make deck stairs. However, the easiest to make use of is solid wood.
How To Build Deck Stairs
The first thing to consider when building deck stairs is making sure you go through municipal zoning requirements. This would enable you to recognize setbacks and no-build zones so you avoid exceeding certain limits.
Here’s a quick step by step guide on how to build deck stairs made of wood;
- Determine rise and run of the stairs
- Prepare concrete floor
- Prepare the stringer
- Attach the stringer
- Cut and attach treads
- Prepare railings
- Determine the Rise and Run of the Stairs
This step requires you to measure the height of the deck going from the ground in inches. The measurement obtained should be divided with the appropriate rise of each step which is 7.5. The result of this division gives you the number of deck stairs to be built. Each stair should have a run of about twelve inches or more. The staircase should have a slope of forty degrees measured from the ground.
- Prepare a Concrete Floor
After determining both rise and run, the areas where the staircase comes in contact with the ground should be marked. A square area with a depth of about six inches should be dug. Ensure that while digging, you get rid of all the grasses and dirt. Going on, fill up to two inches of this area with pea gravel and use a tamper to level it. The rest of the area should be filled with fast-drying cement and leveled with a trowel.
- Prepare the Stringer
Deck stair stringers are made using a 2 × 12 board. To detect the areas of the stringer that need to be cut off, mark the portions with a framing square.
The stringer should be placed in a way that it marks the run of twelve inches and the mark of 7.5 per stair. Making the next step immediately afterward gives you a zig-zag pattern. Return lines from the top stair should be marked and attached to the deck, the step at the bottom, and the concrete base. To get a good finish, use a circular saw to cut before finishing with a hand saw. Repeat this process to make another stringer.
- Attach a Stringer
The right placement of a deck stringer is between the deck and the concrete footer. To check this position, make use of plumb and level. With galvanized deck screws measuring about three inches and angle brackets, attach it to the deck. The attachment of two parallel stringers follows. These stringers are put in position at the base by placing a board of 2×6 between them and using the galvanized screws of three inches to fix them. Using masonry anchors, attach the board and concrete.
- Cut and Attach the Treads
Two lengths of 2×6 boards make up each tread. In this step, you are expected to cut the treads leaving aside an extra length of one inch on each side of the stringer. Tread along the stringer and adjust it to ensure it touches the back end. Using deck screws of three inches, fix the tread there and be sure to maintain the extra one-inch margin on each side. The second tread board should be placed on the same step and fixed, leaving aside a gap of ¼” between both tread boards. Repeat this process until you have attached all the steps.
- Prepare the Railings
To make the railings, 4×4 posts are used. Cut out two pieces of the 4×4 posts by thirty inches each. To allow close attachment to the stringer, the bottom-most tread notch is cut off only by a little portion. The posts are fixed to the stringer using deck screws of four inches maintaining a vertical layout or arrangement. The 2×4 railings should be cut and made to attain the same length of distance between the deck railing and the lower post. Deck screws of three inches should be used to attach the railing to both the post and the deck itself. While making this attachment, keep the railing parallel to the slope of the stairs. Each step should have balusters attached to it and a distance of not more than six inches should be maintained between them.
Note that the steps above are not entirely strict. Modifications are determined by preferences and can come in various ways. For instance, the rise of the step can be decreased and the run can be increased, or a lower railing can be used as the baluster base and the balusters can be selected from various shapes depending on the look you would like your deck stairs to have. Nevertheless, ensure that the height of the railing from the stairs is only between three inches to four inches.
How To Build Stair Stringers
Materials and tools required;
- 3″ deck screws
- ¾” plywood
- 2×12 boards
- 2×6 boards
- 2×4 boards
- Adhesive (construction adhesive)
- Hand saw
- Table saw
- Reciprocating saw
- Miter saw
- Masonry bit
- Framing square
- Hammer
- Drill
- Measuring tape
- Pencil
- Framing nailer
- Pry bar
- Countersink bit
- Level
Procedure
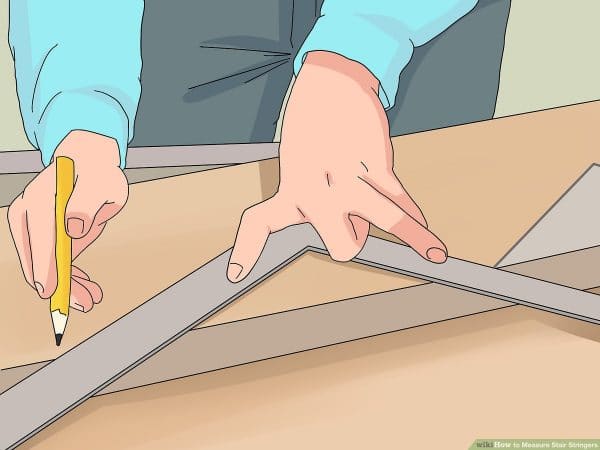
- Use a framing square to measure the dimensions of the tread and riser on a 2×12 board and tighten a locking nut on each measurement taken. Mark the dimension with the framing square laid on the 2×12 board. The framing square should be aligned in a way that the lines of both the top of the second step and the bottom of the first steps meet.
- Cut along the lines with a circular saw. All the treads should be cut in a single direction or angle and the risers in a different angle.
- For a nice and sharp cut on the corners, finish with a hand saw working back and forth.
- The number of steps needed would determine how you cut the 2×12 stringer on the miter saw. The front edge of the first landing is where the stringer should be placed.
- Attach the portion of the tread to the floor using the 3″ deck screws.
- Attach a 2×4 board beneath the stringers. The top of the 2″×4″ should be placed on the table saw in a way that sits tightly between the landing and the stringer, then screw it into place.
- Cut the ¾” plywood to the same width as the stair and nail the riser facing upright. Nail down to the bottom. Using a table saw, tear the 2″ × 12″ so it attains the same depth as the right tread, then process to reduce the length with a miter saw.
- Before setting the treads into place, use the construction adhesive to run along the side of the stringer. Nail down the treads into place with framing nails.
- To make a 90° turn, add winder landings. To do this, construct three different 30° boxes, all angled out of the 2″ × 12″ that was initially torn to fit the height of the riser. Mark angles on the wood and uses a circular saw to achieve miter cuts. The reciprocating saw should be used to finish cutting the 2″×12″. The triangular boxes should be nailed together with framing nails.
- To put the first winder in place, apply the construction adhesive on the edges of the third landing and nail the toes into position. Repeat this process for the second and third landings. Afterward, cut the triangular treads so they can fit each winder’s landing. If the tread has a width of more than twelve inches, join two pieces with a cleat made out of ¾” plywood on the back and screw into position. Attach the winder landing treads with nails and glue. Note that the stringer should not be spaced beyond twelve inches on the center.
Stair Stringer Calculator

Here’s a step by step guide on how to calculate the stringer of your deck stairs;
- The first step is to find or determine the overall height of your deck stairs. You can do this using a tape measure from the top surface of the deck down to the edge noting the distance to the ground.
- The next height to be determined is the height of the rise per step. The appropriate height of stairs is within the range of seven inches to seven and a half inches. This is because making your stairs higher than that would make climbing is difficult and making them any shorter could lead to stumbling while climbing.
- Now that you have measured the height of the stairs and the desired height of the rise, divide both values. If your result is a fraction, round it up to the nearest whole number and make adjustments to the height of the stairs. Using the same formula, divide the total height of your deck stairs by the total number of steps, but this time do not round up the measurement.
- Decide on the depth you would prefer your steps to have and multiply by the number of desired steps. A depth of ten inches is recommended. The value is the total distance of the stairs from the starting point to the deck.
- After the determination of all the right dimensions, sketch or draw out a plan for your stairs so you can have a picture of how your stringer boards will look. Your variables should include the total distance, step rise, overall height, and step run.
Cost of Building Deck Stairs

Generally, the cost of materials and Installation (DIY or professional) would determine the total and exact cost for different projects. Wooden deck stairs have a common cost range of $115 to $210 per deck stair. This amounts to about $440 to $1,350 for professional Installation.
The average cost for DIY projects is $24 to $47 per deck stair.
Deck Stairs Code Guidelines
Deck stair codes are regulations put together to promote safety. This is because when built or constructed inappropriately or haphazardly, the effects could be disastrous.
Take note of the following requirements before you go on with your project.
- The treads of your deck stair should be at least ten inches deep when measured from the front to the back. The weight of the treads should be three hundred pounds, at the very least in a four-inches square area.
- The rails of your deck stair should be between thirty-four to thirty-eight inches in height when measured from the tip of the tread to the top of the rail vertically.
- The rise from tread to tread should not be more than seven and one-quarter inches high.
Decks are flat platforms that are adjoined to a house or building. They are usually built without a roof. To allow easy flow of traffic between the patio and the deck itself, a wide set of deck stairs is constructed.