Nothing is more beautiful for small children than to romp in the garden and explain their own playhouse to the pirate fortress or princess castle. Unfortunately, most of the playhouses in the trade are either inferior or surprisingly expensive. So why not draw paper and pencil and design the playhouse for your own children? In this way, individual wishes can be realized and a building is created which can be proud of the whole family afterwards.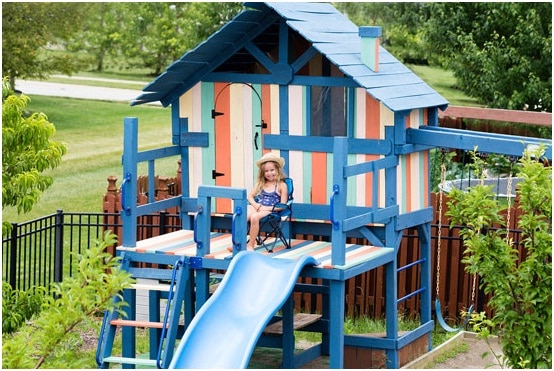
Is a building permit required for the playhouse?
A playhouse in a normal dimension is considered to be a toy and not a building, so no building permission is necessary in the normal case. Make sure, however, that the house is not too close to the neighboring property or the neighbors the view robbs, otherwise it could complain from next door. If you would like to build an exceptionally large playhouse, you should first inquire with the responsible municipality which requirements you have to fulfill. Perhaps in this case, a building inspection and a static calculation will be necessary.
This should be taken into account when planning
Now it is up to the precise planning of your house. First, look into the garden where the best place for your building is. Keep in mind that small children should play in the shade in the summer, so the placement under a tree can be a very good idea. On the other hand, there may be the possibility to integrate an existing secondary building into the building, for example as a side support or for an additional fenced play area on the roof.
Many opportunities for the children
Which game components should your house have? In order to facilitate the planning, we have prepared a list from which you and your children can choose something:
- stalk
- climbing net
- rope ladder
- Climbing and rocking rope
- wooden ladder
- stairway
- Climbing wall elements
- fireman’s pole
- suspension bridge
- Besides turrets
- swing pole
- slide
- Chin Up
- Balcony / veranda
- sandpit
- Windows / shutters
- flower boxes
- Light / electrics
The individual components and their diverse design options allow for a high degree of individuality, even the construction can be very different. We provide a basic guide according to simple concept, which you can customize your own ideas.
Build a playhouse: our guide
Our playhouse has stilts, a sand box with benches and a climbing net. Of course, you can also omit the sandbox, build the house directly on the floor and thus also save the possibility of climbing. The basic principle, however, remains the same.
Materials:
- stable timber construction
- Wooden boards for dressing
- stainless metal brackets
- stainless screws
- stainless impact sleeves
- Concrete and bucket
- climbing net
- roofing felt
- Roofing nails
Tools:
- Cordless Screwdriver
- circular saw
- Drilling machine
- hammer
- gas burner
- shovel
- Anchage 4 stilts in the ground, either by means of impact sleeves, which are driven firmly into the ground, or by concreting. For a particularly high playhouse, the use of concrete on all stilts is recommended to secure the playhouse sufficiently.
- Erect a rectangular frame on the stilts, which you support with diagonal wooden beams from below. Screw everything with stable angles.
- Place your stable floorboards on this frame, which you screw down firmly at the ends. Now you have created an elevated platform that still needs walls and roof.
- Now erect the corner posts for your house as a kind of extension of the stilts. Screw back everything with stable angle brackets.
- Screw boards from the outside on three sides to the uprights, at our cottage only halfway up so that the children can look over the walls. You can also pull the walls completely upwards and install windows.
- The fourth, the only remaining open side, is half-way up a stable wooden cross-link between the two adjoining corner paws: the climbing net is suspended here.
- On the four wooden corner posts, you should now erect a truss, preferably in a saddle roof form, but it can also be flattened for the sake of simplicity.
- Cover the roof with roofing. The material can be fixed well with roofing nails, then seal all overlaps and edges with the gas burner.
- Mount a completed climbing net at the designated side, so that it pulls from the floor to the upper shackle edge. Prefabricated nets have fastening and tensioning devices which simplify the mounting.
- Mark the rectangular area below the playhouse with tensioning cords and lift out the sandbox area. Lay the floor with stones or stone slabs. Do not grout the stones so that the rain water can drain.
- Narrow the sides of the sandpit with the well-impregnated wooden planks. On each side, place two planks at a distance of about 15 cm from each other and fasten them with concrete or solid ground.
- Screw on the upper longitudinal edges of the vertical standing planks a horizontal board for sitting and sand cake baking.
- Fill the sandbox with clean sand and lots of toys, also think of a flexible cover against any kind of dirt.
Additional possibilities for the new playhouse
Now you have built a complete playhouse on stilts, which can be supplemented at will. How about a small slide, which stands below the house and runs out in the sandbox? Or would you prefer to build a large slide that leads from the open side of the upper floor into the garden?
With a side support to the garage or to the front of the house you also secure your own house. A further side boom with a post anchored firmly in the ground might well carry a swing if the construction of the playhouse is sufficiently stable.
Climbing rope as a climb
Larger children are surely also happy about a flap in the ground through which one can drop a climbing rope. For small children, however, it is probably worth installing a staircase or ladder with enough wide steps for safe climbing.
Of course, you can also close the playhouse all around with walls, install doors and windows, and build a home for your children, which also invites you to spend the night. Planted flower boxes and child-friendly furniture make the cottage even more comfortable, so that your children in the summer probably no longer want to go into the real house.
Our tip: Think about everything you do, especially about the safety of your children. A solid anchoring in the ground, perhaps even a professional foundation, is the basic prerequisite for a tilt-resistant stilts house. With a view to safety, always set the house at an appropriate age, ensure an effective fall protection and practice the use of the climbing net and rope with your children.